eBay Photo Requirements That Help Listings Look Safer to Buy
eBay product photos do more than fill a listing. They prove condition, set buyer expectations, and decide whether your main image earns the click. This guide explains the current eBay photo requirements, the visual mistakes that weaken trust, and a repeatable workflow for creating compliant, sharper listing images without rebuilding a studio for every item.
Every eBay listing needs at least one product photo, and eBay states that photos must be at least 500 pixels on the longest side. For better listing quality, eBay recommends images around 1600 x 1600 pixels and allows up to 24 photos per listing. That gives sellers enough room to show the main item, alternate angles, details, scale, condition issues, packaging, and use context.
The rules are not just technical. eBay also prohibits photos that misrepresent the item, placeholder images that communicate messages, added borders, added text, marketing graphics, and watermarks. For used, damaged, or defective items, stock photos are not allowed because the buyer needs to see the exact condition of the item being sold.
Think of the requirements as the floor, not the target. A 500-pixel image can technically pass, but it may still look weak when buyers zoom, compare listings, or view search results on larger screens. The commercial target is clearer: make the product easy to inspect quickly, keep the main image honest, and use supporting photos to remove doubt before the buyer has to ask a question.
That is where many sellers lose time. They do not fail because they lack one photo. They fail because the first image is dim, the background is distracting, the scale is unclear, and each listing looks like it came from a different workflow. Compliance gets the photo accepted. Consistency helps the buyer feel safe.
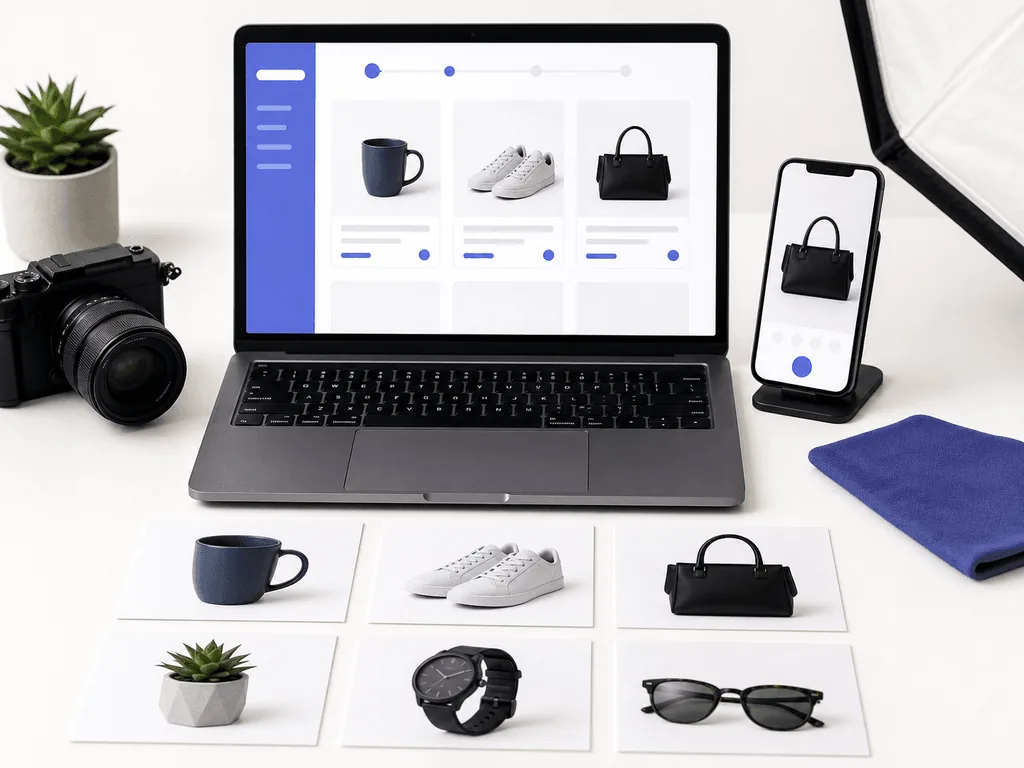
How Should Your Main eBay Photo Be Built?
The first eBay photo is the image that appears beside the item title in search results, so it carries the heaviest job. It should show the whole item clearly, usually face-on or at a clean three-quarter angle, with enough contrast that the product reads at thumbnail size. If the buyer cannot identify the item immediately, the listing starts behind competing results.
Use a neutral or white background for most products. eBay notes that white backgrounds are generally best, while darker backgrounds can work better for shiny or reflective items such as jewelry. The key is not whether the background is dramatic. The key is whether it makes the product easier to inspect. A busy desk, wrinkled fabric, or messy room adds visual noise and can make the item feel less trustworthy.
Do not add badges, logos, copyright marks, sale text, or borders to the image. Those elements may feel like merchandising, but eBay's policy treats added text, artwork, marketing material, borders, and watermarks as not allowed. Put selling claims in the title, item specifics, or description instead. Let the image prove the item.
Before publishing, view the main photo as a small thumbnail and as a zoomed product image. The thumbnail should answer "what is it?" The zoom should answer "what condition is it in?" If the same photo cannot do both jobs, create a better main image rather than trying to fix the listing with more copy.
Which Extra Photos Reduce Buyer Doubt?
Use the gallery to answer buying questions in sequence. After the main photo, show an angle that explains shape, a close-up that proves material or condition, a scale photo if size is not obvious, and images of any flaws, scratches, wear, missing pieces, or package details. For bundles, show everything included. For single items, avoid making the main image look like it includes variations that are not part of the sale.
This matters because returns often begin with mismatched expectations. A buyer who sees every scratch, texture, port, seam, label, or accessory before purchase is less likely to feel surprised later. Clear photos can feel less glamorous than styled photos, but they do a more important job: they make the buyer confident that the listing is honest.
A strong eBay gallery often follows this order: clean main image, three-quarter angle, back or side view, detail close-up, scale image, condition issue image if needed, packaging or bundle contents, then a use-context or lifestyle image. You do not need all 24 slots for every item. You need enough images to remove the doubts that apply to that category.
The mistake is using extra photo slots as decoration. If a photo does not answer a buyer question, replace it with one that does. A watch needs clasp, face, strap, and wear details. Shoes need soles, sides, size label, and flaws. Electronics need ports, screen condition, accessories, and proof of form. Each image should earn its place.
How Do You Shoot Better Source Photos Before Editing?
Start with light control. Use indirect window light or a large diffused light source, turn off mixed room lighting, and avoid direct flash. eBay specifically recommends reducing glare by avoiding flash or overhead lighting. Glare hides details, especially on glossy packaging, screens, jewelry, watches, and electronics. Move the product and camera slowly until reflections become controlled gradients instead of bright patches.
Keep the camera stable. A tripod, phone stand, or flat surface with a timer is enough for many sellers. Stability matters because blur makes condition harder to inspect, and inconsistent angles make a store or seller profile feel less organized. If you are photographing many listings, mark the table position and camera distance so the workflow is repeatable.
Shoot larger than the minimum. Since eBay recommends about 1600 x 1600 pixels, capture with enough resolution for cropping and zoom. Leave space around the product so you can straighten and crop without cutting off handles, corners, straps, edges, or packaging. For most items, a square-friendly composition is safer because marketplace thumbnails and placements often reward balanced framing.
Clean the item and the background before taking the photo. Dust, fingerprints, lint, price stickers, and clutter are harder to remove later than they are to prevent. Good AI editing works best when the source image is honest, sharp, and readable. The cleaner the input, the less the tool has to guess.
Before-After-Bridge: From Random Listing Photos to a Selling System
Before: a seller lists items whenever there is free time. One product is photographed at night on a kitchen counter, another beside a window, and another on a patterned blanket. Some photos pass the minimum size rule, but the listing gallery feels improvised. Buyers can see the item, yet they still hesitate because condition, scale, and consistency are not clear.
After: the seller builds a simple photo system. Every item gets a clean main image, a clear side or back view, close-ups for details, and honest condition photos. The background stays neutral, the crop is consistent, and each photo answers a buyer question. The listings start to feel more professional without pretending the item is new or hiding flaws.
Bridge: Pixora helps with the production step after the source photo is captured. Instead of manually cleaning backgrounds, testing lighting looks, or writing prompts for each item, sellers can choose Smart Presets that match the photo job. Fashion E-commerce Studio: Clean White Background works for apparel and bags. Accessory Studio: Clean White Background helps jewelry, watches, and smaller items read cleanly. Tech Studio: Clean White Background supports electronics that need simple, trustworthy product presentation.
That bridge protects both speed and honesty. The original product still needs to be real and accurately shown. Pixora simply helps turn a good source image into a clearer listing asset faster, so sellers stop losing launch time to repetitive editing.
How Can Pixora Fit an eBay Listing Workflow?
Use Pixora after you have captured an accurate source image. The safest workflow is to create the compliant clarity image first, then build supporting visuals only where they help the buyer understand the item. Start with a clean white or neutral-background preset for the main photo. Then use a category-matched preset for supporting images when lifestyle context, scale, or material appeal matters.
For fashion items, pair Fashion E-commerce Studio: Clean White Background with Fashion Lifestyle: On-Model Photography when the listing needs both clarity and fit context. For watches, jewelry, eyewear, and collectibles, use Accessory Studio: Clean White Background or Accessory Still Life: Aesthetic Display depending on whether the image needs strict clarity or premium presentation. For gadgets, Tech Studio: Clean White Background keeps ports and forms easy to inspect, while Tech Lifestyle: Modern Context can support secondary images.
Do not use AI to hide condition issues. If an item is scratched, worn, refurbished, incomplete, or used, show that truth clearly in the gallery. Pixora is most useful for removing production friction: cleaner backgrounds, stronger lighting, consistent crops, and faster generation of channel-ready assets.
A practical batch workflow looks like this: photograph ten items with the same setup, select the best source image for each, generate the main image with the right clean preset, create one or two supporting images when needed, then review every final output against the actual product before uploading. That gives you speed without sacrificing buyer trust.
Credits and Supported Resources
This guide uses official eBay seller documentation as its compliance baseline. Review eBay's Picture policy for the minimum 500-pixel rule and prohibited image treatments, and eBay's Adding pictures to your listings guide for the 24-photo limit, 12MB upload guidance, recommended 1600 x 1600 image size, accepted file formats, main photo role, background tips, and seller photo workflow advice.
For broader listing context, see eBay's Creating a listing guide. Pixora-specific workflow recommendations in this article are based on the current published preset library available inside the product, including fashion, accessory, electronics, and lifestyle presets.
eBay Photo Problems This Solves
Images meet the minimum rule but still look blurry, dim, or hard to inspect
Main photos lose clicks because the product is surrounded by clutter
Used-item listings create return risk by hiding flaws or condition details
Each listing takes too long because background cleanup starts from zero
eBay Photo Numbers to Remember
500px
Minimum longest-side image size required by eBay's picture policy
1600px
Approximate square image size eBay recommends for stronger listing quality
24
Maximum number of pictures eBay allows sellers to add to a listing
Create Cleaner eBay Listing Photos Faster
Upload an accurate source image, choose a Smart Preset, and generate cleaner white-background or supporting product visuals without prompt writing.
Use stable camera placement, soft light, neutral background, and enough resolution for cropping and zoom.
A source image that shows the real product, condition, and edges clearly.
02
Build the Buyer-Trust Gallery
Create a clear main image first, then add angles, close-ups, scale, flaws, bundle contents, or packaging as needed.
A listing gallery that reduces uncertainty instead of only decorating the page.
03
Use AI for Production Speed
Apply Pixora presets for clean backgrounds, consistent lighting, and category-matched supporting visuals.
More listing-ready images from fewer manual edits and fewer repeated setups.
eBay Photo Checklist Before Publishing
At least one image is included and every image is at least 500 pixels on the longest side
The main photo shows the whole item clearly without added text, borders, logos, or watermarks
The gallery includes close-ups of important condition details and flaws
The product is photographed against a clean, uncluttered, neutral background
Final AI-edited images are checked against the real item before upload
What Improves With a Better eBay Photo System
Listings look more trustworthy before buyers read the description
Condition questions drop because photos answer them upfront
Main images become easier to recognize in search results
Batch listing becomes faster because the photo workflow is repeatable
Small sellers can create cleaner presentation without a full studio setup
Share this article
Build eBay Photos That Buyers Can Trust
Stop losing listing momentum to cluttered backgrounds and slow edits. Capture the item honestly, choose a Smart Preset, and create cleaner product visuals in minutes.
eBay requires photos to be at least 500 pixels on the longest side. eBay also recommends images around 1600 x 1600 pixels for better listing quality.
eBay allows sellers to add up to 24 pictures to a listing. You do not need to use every slot, but you should add enough images to show the item, condition, scale, and important details.
No. eBay's picture policy does not allow added text, artwork, marketing material, borders, or watermarks in listing photos.
White or neutral backgrounds are usually best because they keep attention on the item. eBay notes that darker backgrounds can work better for reflective items such as jewelry.
Use AI carefully. The final image still needs to accurately represent the exact item and its condition. AI is useful for cleaner backgrounds and consistent presentation, but it should not hide flaws or change the product.
Start with Fashion E-commerce Studio: Clean White Background, Accessory Studio: Clean White Background, or Tech Studio: Clean White Background for clear listing images. Add lifestyle presets only when supporting context helps the buyer.